Google APIs & Developer Products - January 2011
Creative way of displaying all of Google's API and Developer Products and their relationships to each other. They sure have been busy.

An Android Developer's Blog
Wednesday, January 26, 2011
Monday, January 24, 2011
OnClickListener for ListActivity
I want to be able to show some detailed information about each Dodad. I want to allow the user to click on a Dodad from the ListActivity and have the app display a screen which contains detailed Dodad information. I can use the OnClickListener to capture the user's click on the ListActivity and I can use Intent and a new Activity to display a new screen.
Let's start by defining our new Activity that will display Dodad detail information. Simply create a new class that extends Activity and override the onCreate method. You should have something like this.
DodadDetails.java
For now let's just make a simple layout called dodad_details. It can simply be a TextView as a placeholder.
Since we created a new Activity in our Android app let's not forget to add it to the AndroidManifest.
Now let's go back to our ListActivity implementation and construct a new private class that implements OnClickListener. Within the constructor for this new class pass in an integer value that will hold the index of the ListActivity item that the user clicked. We also want to override the onClick method so we can create our Intent and start our new DodadDetails Activity.
The new OnClickListener class should look like this.
We now simply need to add this class as the listener for our ListActivity items (views). We can do this back in the ArrayAdapter class we previously created for the ListActivity. Specifically in the getView method that we have overrode at the end just before it returns. The single line of code that gets this done looks like :
v.setOnClickListener(new OnItemClickListener(position));
Notice that the position is being passed into the constructor. This will be important later so we can determine what data to display on the DodadDetail Activity.
The application can now be run and the user should be able to click on an item from the ListActivity and the DodadDetail Activity should appear. Like...


The entire Welcome.java source is here.
Let's start by defining our new Activity that will display Dodad detail information. Simply create a new class that extends Activity and override the onCreate method. You should have something like this.
DodadDetails.java
package com.mydemo;
import android.app.Activity;
import android.os.Bundle;
import android.util.Log;
public class DodadDetails extends Activity {
private static final String TAG = "MyDemo";
/** Called when the activity is first created. */
@Override
public void onCreate(Bundle savedInstanceState) {
Log.d(TAG, "DodadDetails onCreate() started");
super.onCreate(savedInstanceState);
setContentView(R.layout.dodad_details);
Log.d(TAG, "DodadDetails onCreate() done");
}
}
For now let's just make a simple layout called dodad_details. It can simply be a TextView as a placeholder.
Since we created a new Activity in our Android app let's not forget to add it to the AndroidManifest.
Now let's go back to our ListActivity implementation and construct a new private class that implements OnClickListener. Within the constructor for this new class pass in an integer value that will hold the index of the ListActivity item that the user clicked. We also want to override the onClick method so we can create our Intent and start our new DodadDetails Activity.
The new OnClickListener class should look like this.
private class OnItemClickListener implements OnClickListener
{
private int mPosition;
OnItemClickListener(int position)
{
mPosition = position;
}
@Override
public void onClick(View arg0)
{
Log.v(TAG, "Dodad onItemClick at position" + mPosition);
Intent intent = new Intent(Welcome.this, DodadDetails.class);
Welcome.this.startActivity(intent);
}
}
{
private int mPosition;
OnItemClickListener(int position)
{
mPosition = position;
}
@Override
public void onClick(View arg0)
{
Log.v(TAG, "Dodad onItemClick at position" + mPosition);
Intent intent = new Intent(Welcome.this, DodadDetails.class);
Welcome.this.startActivity(intent);
}
}
We now simply need to add this class as the listener for our ListActivity items (views). We can do this back in the ArrayAdapter class we previously created for the ListActivity. Specifically in the getView method that we have overrode at the end just before it returns. The single line of code that gets this done looks like :
v.setOnClickListener(new OnItemClickListener(position));
Notice that the position is being passed into the constructor. This will be important later so we can determine what data to display on the DodadDetail Activity.
The application can now be run and the user should be able to click on an item from the ListActivity and the DodadDetail Activity should appear. Like...


The entire Welcome.java source is here.
package com.mydemo;
import java.util.ArrayList;
import com.mydemo.dodad.Dodad;
import android.app.ListActivity;
import android.app.ProgressDialog;
import android.content.Context;
import android.content.Intent;
import android.os.Bundle;
import android.util.Log;
import android.view.LayoutInflater;
import android.view.View;
import android.view.ViewGroup;
import android.view.View.OnClickListener;
import android.widget.ArrayAdapter;
import android.widget.TextView;
public class Welcome extends ListActivity {
private static final String TAG = "MyDemo";
private ProgressDialog m_ProgressDialog = null;
private Runnable runGetDodads;
private ArrayList m_dodads = null;
private DodadAdapter m_adapter;
public void onCreate(Bundle savedInstanceState) {
Log.d(TAG, "Welcome onCreate() start");
super.onCreate(savedInstanceState);
setContentView(R.layout.main);
m_dodads = new ArrayList();
this.m_adapter = new DodadAdapter(this, R.layout.dodad_row, m_dodads);
setListAdapter(this.m_adapter);
runGetDodads = new Runnable()
{
@Override
public void run() {
getDodads();
}
};
Thread thread = new Thread(null, runGetDodads, "getDodads");
thread.start();
m_ProgressDialog = ProgressDialog.show(Welcome.this, "One second...", "Fetching Dodads...", true);
Log.d(TAG, "Welcome onCreate() done");
}
private Runnable returnRes = new Runnable()
{
@Override
public void run()
{
if(m_dodads != null && m_dodads.size() > 0)
{
for(int i=0; i < m_dodads.size(); i++) { m_adapter.add(m_dodads.get(i)); } m_adapter.notifyDataSetChanged(); } m_ProgressDialog.dismiss(); } }; private void getDodads() { Log.d(TAG, "Welcome getDodads() start"); try { // Just some dummy data for the purpose of the sample // This code could easily fetch data from a server/database. m_dodads = new ArrayList();
Dodad dodad1 = new Dodad();
dodad1.setName("Dodad Number 1");
dodad1.setDescription("Cool little Dodad");
Dodad dodad2 = new Dodad();
dodad2.setName("Dodad Number 2");
dodad2.setDescription("The everyday Dodad");
Dodad dodad3 = new Dodad();
dodad3.setName("Dodad Number 3");
dodad3.setDescription("Essential do everything Dodad");
m_dodads.add(dodad1);
m_dodads.add(dodad2);
m_dodads.add(dodad3);
// This simulates the time it would take to load the Dodads
Thread.sleep(3000);
Log.d(TAG, "Welcome getDodads() returned (" + m_dodads.size() + ") dodads");
}
catch (Exception e)
{
Log.e(TAG, e.getMessage());
}
runOnUiThread(returnRes);
Log.d(TAG, "Welcome getDodads() done");
}
private class DodadAdapter extends ArrayAdapter
{
private ArrayList dodads;
public DodadAdapter(Context context, int textViewResourceId, ArrayList dodads)
{
super(context, textViewResourceId, dodads);
this.dodads = dodads;
}
@Override
public View getView(int position, View convertView, ViewGroup parent)
{
View v = convertView;
if (v == null)
{
LayoutInflater vi = (LayoutInflater)getSystemService(Context.LAYOUT_INFLATER_SERVICE);
v = vi.inflate(R.layout.dodad_row, null);
}
Dodad dodad = dodads.get(position);
if (dodad != null)
{
TextView line1 = (TextView) v.findViewById(R.id.textDodadLine1);
if (line1 != null)
{
line1.setText(dodad.getName());
}
TextView line2 = (TextView) v.findViewById(R.id.textDodadLine2);
if(line2 != null)
{
line2.setText(dodad.getDescription());
}
}
v.setOnClickListener(new OnItemClickListener(position));
return v;
}
}
private class OnItemClickListener implements OnClickListener
{
private int mPosition;
OnItemClickListener(int position)
{
mPosition = position;
}
@Override
public void onClick(View arg0)
{
Log.v(TAG, "Dodad onItemClick at position" + mPosition);
Intent intent = new Intent(Welcome.this, DodadDetails.class);
Welcome.this.startActivity(intent);
}
}
}
import java.util.ArrayList;
import com.mydemo.dodad.Dodad;
import android.app.ListActivity;
import android.app.ProgressDialog;
import android.content.Context;
import android.content.Intent;
import android.os.Bundle;
import android.util.Log;
import android.view.LayoutInflater;
import android.view.View;
import android.view.ViewGroup;
import android.view.View.OnClickListener;
import android.widget.ArrayAdapter;
import android.widget.TextView;
public class Welcome extends ListActivity {
private static final String TAG = "MyDemo";
private ProgressDialog m_ProgressDialog = null;
private Runnable runGetDodads;
private ArrayList
private DodadAdapter m_adapter;
public void onCreate(Bundle savedInstanceState) {
Log.d(TAG, "Welcome onCreate() start");
super.onCreate(savedInstanceState);
setContentView(R.layout.main);
m_dodads = new ArrayList
this.m_adapter = new DodadAdapter(this, R.layout.dodad_row, m_dodads);
setListAdapter(this.m_adapter);
runGetDodads = new Runnable()
{
@Override
public void run() {
getDodads();
}
};
Thread thread = new Thread(null, runGetDodads, "getDodads");
thread.start();
m_ProgressDialog = ProgressDialog.show(Welcome.this, "One second...", "Fetching Dodads...", true);
Log.d(TAG, "Welcome onCreate() done");
}
private Runnable returnRes = new Runnable()
{
@Override
public void run()
{
if(m_dodads != null && m_dodads.size() > 0)
{
for(int i=0; i < m_dodads.size(); i++) { m_adapter.add(m_dodads.get(i)); } m_adapter.notifyDataSetChanged(); } m_ProgressDialog.dismiss(); } }; private void getDodads() { Log.d(TAG, "Welcome getDodads() start"); try { // Just some dummy data for the purpose of the sample // This code could easily fetch data from a server/database. m_dodads = new ArrayList
Dodad dodad1 = new Dodad();
dodad1.setName("Dodad Number 1");
dodad1.setDescription("Cool little Dodad");
Dodad dodad2 = new Dodad();
dodad2.setName("Dodad Number 2");
dodad2.setDescription("The everyday Dodad");
Dodad dodad3 = new Dodad();
dodad3.setName("Dodad Number 3");
dodad3.setDescription("Essential do everything Dodad");
m_dodads.add(dodad1);
m_dodads.add(dodad2);
m_dodads.add(dodad3);
// This simulates the time it would take to load the Dodads
Thread.sleep(3000);
Log.d(TAG, "Welcome getDodads() returned (" + m_dodads.size() + ") dodads");
}
catch (Exception e)
{
Log.e(TAG, e.getMessage());
}
runOnUiThread(returnRes);
Log.d(TAG, "Welcome getDodads() done");
}
private class DodadAdapter extends ArrayAdapter
{
private ArrayList
public DodadAdapter(Context context, int textViewResourceId, ArrayList
{
super(context, textViewResourceId, dodads);
this.dodads = dodads;
}
@Override
public View getView(int position, View convertView, ViewGroup parent)
{
View v = convertView;
if (v == null)
{
LayoutInflater vi = (LayoutInflater)getSystemService(Context.LAYOUT_INFLATER_SERVICE);
v = vi.inflate(R.layout.dodad_row, null);
}
Dodad dodad = dodads.get(position);
if (dodad != null)
{
TextView line1 = (TextView) v.findViewById(R.id.textDodadLine1);
if (line1 != null)
{
line1.setText(dodad.getName());
}
TextView line2 = (TextView) v.findViewById(R.id.textDodadLine2);
if(line2 != null)
{
line2.setText(dodad.getDescription());
}
}
v.setOnClickListener(new OnItemClickListener(position));
return v;
}
}
private class OnItemClickListener implements OnClickListener
{
private int mPosition;
OnItemClickListener(int position)
{
mPosition = position;
}
@Override
public void onClick(View arg0)
{
Log.v(TAG, "Dodad onItemClick at position" + mPosition);
Intent intent = new Intent(Welcome.this, DodadDetails.class);
Welcome.this.startActivity(intent);
}
}
}
Sunday, January 23, 2011
DROID BIONIC BY Motorola - Android Social Smartphone - - Overview - Motorola Mobility, Inc. USA
DROID BIONIC BY Motorola - Android Social Smartphone - - Overview - Motorola Mobility, Inc. USA
Looking forward to this phone. Unfortunately I'll still have about 12 months on my Droid X contract when this comes out. Guess I'll have to wait.
Looking forward to the :
Dual core 1 GHz processor.
Touch screen static buttons. (One big gripe I have with the Droid X is those damn buttons.)
Hopefully releases with Gingerbread.
android.app.ProgressDialog
When your app needs to take some time to fetch data and render the UI it's considered polite to present the user with an indication that the application is working and it hasn't frozen and become unresponsive. The Android SDK has a built in ProgressDialog class defined as 'android.app.ProgressDialog'.
I added one to my ListActivity demo to show just how easy it is to work with.
In the onCreate method of my ListActivity I had code that that called a private method that hard coded the Dodad array that was shown in the ListActivity. Although I'm still going to use this method for this demo I am going to change how I'm going to call into it. I'm going to call this method using a new thread.
I'm going to implement two classes provided to us in the Java SDK. The 'Runnable' class and the 'Thread' class.
So the first step is to remove that code that looped over the Dodad array and added it to the ListActivity ArrayAdapter from the onCreate method and into it's own 'Runnable' method.
And what you get is this...
Once you've done this you can remove this code from the onCreate method.
The next step is to wrap the call to getDodads() in the onCreate method of our ListActivity in Runnable class. To be specific we need to override the 'Run' method of the 'Runnable' class.
It looks like this...
The next step is to create the Thread that will execute the 'runGetDodads' method.
It looks like this :
Thread thread = new Thread(null, runGetDodads, "getDodads");
thread.start();
At this point our main thread continues on while the thread we just created executes the getDodads() method. This is when we want to implement the ProgressDialog in our main thread.
It's really simple and the code is just like this :
m_ProgressDialog = ProgressDialog.show(Welcome.this, "One second...", "Fetching Dodads...", true);
We only need two more lines of code before we test the new ProgressDialog. We need to add the line of code that kills the ProgressDialog at the appropriate time, which would be when the getDodads() method is done fetching the Dodads. Actually we want to do it a little after that, after the ListActivity ArrayAdapter has been updated with the data set. This would be at the end of the 'Run' method of our Runnable class.
Notice the call to the 'dismiss' method of the ProgressDialog instance below.
And the last line of code is meant to simulate a load time like accessing a database or a web service. Since our data is hard coded in our application it wouldn't give our ProgessDialog much chance to show itself. We'll add a strategically placed sleep statement in the getDodads() method to sleep the thread for 3 seconds.
Now we can run the app and we should see our progressDialog before the ListActivity is rendered.


Here is the complete source code for Welcome.java
I added one to my ListActivity demo to show just how easy it is to work with.
In the onCreate method of my ListActivity I had code that that called a private method that hard coded the Dodad array that was shown in the ListActivity. Although I'm still going to use this method for this demo I am going to change how I'm going to call into it. I'm going to call this method using a new thread.
I'm going to implement two classes provided to us in the Java SDK. The 'Runnable' class and the 'Thread' class.
So the first step is to remove that code that looped over the Dodad array and added it to the ListActivity ArrayAdapter from the onCreate method and into it's own 'Runnable' method.
And what you get is this...
private Runnable returnRes = new Runnable()
{
@Override
public void run()
{
if(m_dodads != null && m_dodads.size() > 0)
{
for(int i=0; i < m_dodads.size(); i++) { m_adapter.add(m_dodads.get(i)); } m_adapter.notifyDataSetChanged(); } } };
{
@Override
public void run()
{
if(m_dodads != null && m_dodads.size() > 0)
{
for(int i=0; i < m_dodads.size(); i++) { m_adapter.add(m_dodads.get(i)); } m_adapter.notifyDataSetChanged(); } } };
Once you've done this you can remove this code from the onCreate method.
The next step is to wrap the call to getDodads() in the onCreate method of our ListActivity in Runnable class. To be specific we need to override the 'Run' method of the 'Runnable' class.
It looks like this...
runGetDodads = new Runnable()
{
@Override
public void run()
{
getDodads();
}
};
{
@Override
public void run()
{
getDodads();
}
};
The next step is to create the Thread that will execute the 'runGetDodads' method.
It looks like this :
Thread thread = new Thread(null, runGetDodads, "getDodads");
thread.start();
At this point our main thread continues on while the thread we just created executes the getDodads() method. This is when we want to implement the ProgressDialog in our main thread.
It's really simple and the code is just like this :
m_ProgressDialog = ProgressDialog.show(Welcome.this, "One second...", "Fetching Dodads...", true);
We only need two more lines of code before we test the new ProgressDialog. We need to add the line of code that kills the ProgressDialog at the appropriate time, which would be when the getDodads() method is done fetching the Dodads. Actually we want to do it a little after that, after the ListActivity ArrayAdapter has been updated with the data set. This would be at the end of the 'Run' method of our Runnable class.
Notice the call to the 'dismiss' method of the ProgressDialog instance below.
private Runnable returnRes = new Runnable()
{
@Override
public void run()
{
if(m_dodads != null && m_dodads.size() > 0)
{
for(int i=0; i < m_dodads.size(); i++) { m_adapter.add(m_dodads.get(i)); } m_adapter.notifyDataSetChanged(); } m_ProgressDialog.dismiss(); } };
{
@Override
public void run()
{
if(m_dodads != null && m_dodads.size() > 0)
{
for(int i=0; i < m_dodads.size(); i++) { m_adapter.add(m_dodads.get(i)); } m_adapter.notifyDataSetChanged(); } m_ProgressDialog.dismiss(); } };
And the last line of code is meant to simulate a load time like accessing a database or a web service. Since our data is hard coded in our application it wouldn't give our ProgessDialog much chance to show itself. We'll add a strategically placed sleep statement in the getDodads() method to sleep the thread for 3 seconds.
Now we can run the app and we should see our progressDialog before the ListActivity is rendered.


Here is the complete source code for Welcome.java
package com.mydemo;
import java.util.ArrayList;
import com.mydemo.dodad.Dodad;
import android.app.ListActivity;
import android.app.ProgressDialog;
import android.content.Context;
import android.os.Bundle;
import android.util.Log;
import android.view.LayoutInflater;
import android.view.View;
import android.view.ViewGroup;
import android.widget.ArrayAdapter;
import android.widget.TextView;
public class Welcome extends ListActivity {
private static final String TAG = "MyDemo";
private ProgressDialog m_ProgressDialog = null;
private Runnable runGetDodads;
private ArrayList m_dodads = null;
private DodadAdapter m_adapter;
public void onCreate(Bundle savedInstanceState) {
Log.d(TAG, "Welcome onCreate() start");
super.onCreate(savedInstanceState);
setContentView(R.layout.main);
m_dodads = new ArrayList();
this.m_adapter = new DodadAdapter(this, R.layout.dodad_row, m_dodads);
setListAdapter(this.m_adapter);
runGetDodads = new Runnable()
{
@Override
public void run() {
getDodads();
}
};
Thread thread = new Thread(null, runGetDodads, "getDodads");
thread.start();
m_ProgressDialog = ProgressDialog.show(Welcome.this, "One second...", "Fetching Dodads...", true);
Log.d(TAG, "Welcome onCreate() done");
}
private Runnable returnRes = new Runnable()
{
@Override
public void run()
{
if(m_dodads != null && m_dodads.size() > 0)
{
for(int i=0; i < m_dodads.size(); i++) { m_adapter.add(m_dodads.get(i)); } m_adapter.notifyDataSetChanged(); } m_ProgressDialog.dismiss(); } }; private void getDodads() { Log.d(TAG, "Welcome getDodads() start"); try { // Just some dummy data for the purpose of the sample // This code could easily fetch data from a server/database. m_dodads = new ArrayList();
Dodad dodad1 = new Dodad();
dodad1.setName("Dodad Number 1");
dodad1.setDescription("Cool little Dodad");
Dodad dodad2 = new Dodad();
dodad2.setName("Dodad Number 2");
dodad2.setDescription("The everyday Dodad");
Dodad dodad3 = new Dodad();
dodad3.setName("Dodad Number 3");
dodad3.setDescription("Essential do everything Dodad");
m_dodads.add(dodad1);
m_dodads.add(dodad2);
m_dodads.add(dodad3);
// This simulates the time it would take to load the Dodads
Thread.sleep(3000);
Log.d(TAG, "Welcome getDodads() returned (" + m_dodads.size() + ") dodads");
}
catch (Exception e)
{
Log.e(TAG, e.getMessage());
}
runOnUiThread(returnRes);
Log.d(TAG, "Welcome getDodads() done");
}
private class DodadAdapter extends ArrayAdapter
{
private ArrayList dodads;
public DodadAdapter(Context context, int textViewResourceId, ArrayList dodads)
{
super(context, textViewResourceId, dodads);
this.dodads = dodads;
}
@Override
public View getView(int position, View convertView, ViewGroup parent)
{
View v = convertView;
if (v == null)
{
LayoutInflater vi = (LayoutInflater)getSystemService(Context.LAYOUT_INFLATER_SERVICE);
v = vi.inflate(R.layout.dodad_row, null);
}
Dodad dodad = dodads.get(position);
if (dodad != null)
{
TextView line1 = (TextView) v.findViewById(R.id.textDodadLine1);
if (line1 != null)
{
line1.setText(dodad.getName());
}
TextView line2 = (TextView) v.findViewById(R.id.textDodadLine2);
if(line2 != null)
{
line2.setText(dodad.getDescription());
}
}
return v;
}
}
}
import java.util.ArrayList;
import com.mydemo.dodad.Dodad;
import android.app.ListActivity;
import android.app.ProgressDialog;
import android.content.Context;
import android.os.Bundle;
import android.util.Log;
import android.view.LayoutInflater;
import android.view.View;
import android.view.ViewGroup;
import android.widget.ArrayAdapter;
import android.widget.TextView;
public class Welcome extends ListActivity {
private static final String TAG = "MyDemo";
private ProgressDialog m_ProgressDialog = null;
private Runnable runGetDodads;
private ArrayList
private DodadAdapter m_adapter;
public void onCreate(Bundle savedInstanceState) {
Log.d(TAG, "Welcome onCreate() start");
super.onCreate(savedInstanceState);
setContentView(R.layout.main);
m_dodads = new ArrayList
this.m_adapter = new DodadAdapter(this, R.layout.dodad_row, m_dodads);
setListAdapter(this.m_adapter);
runGetDodads = new Runnable()
{
@Override
public void run() {
getDodads();
}
};
Thread thread = new Thread(null, runGetDodads, "getDodads");
thread.start();
m_ProgressDialog = ProgressDialog.show(Welcome.this, "One second...", "Fetching Dodads...", true);
Log.d(TAG, "Welcome onCreate() done");
}
private Runnable returnRes = new Runnable()
{
@Override
public void run()
{
if(m_dodads != null && m_dodads.size() > 0)
{
for(int i=0; i < m_dodads.size(); i++) { m_adapter.add(m_dodads.get(i)); } m_adapter.notifyDataSetChanged(); } m_ProgressDialog.dismiss(); } }; private void getDodads() { Log.d(TAG, "Welcome getDodads() start"); try { // Just some dummy data for the purpose of the sample // This code could easily fetch data from a server/database. m_dodads = new ArrayList
Dodad dodad1 = new Dodad();
dodad1.setName("Dodad Number 1");
dodad1.setDescription("Cool little Dodad");
Dodad dodad2 = new Dodad();
dodad2.setName("Dodad Number 2");
dodad2.setDescription("The everyday Dodad");
Dodad dodad3 = new Dodad();
dodad3.setName("Dodad Number 3");
dodad3.setDescription("Essential do everything Dodad");
m_dodads.add(dodad1);
m_dodads.add(dodad2);
m_dodads.add(dodad3);
// This simulates the time it would take to load the Dodads
Thread.sleep(3000);
Log.d(TAG, "Welcome getDodads() returned (" + m_dodads.size() + ") dodads");
}
catch (Exception e)
{
Log.e(TAG, e.getMessage());
}
runOnUiThread(returnRes);
Log.d(TAG, "Welcome getDodads() done");
}
private class DodadAdapter extends ArrayAdapter
{
private ArrayList
public DodadAdapter(Context context, int textViewResourceId, ArrayList
{
super(context, textViewResourceId, dodads);
this.dodads = dodads;
}
@Override
public View getView(int position, View convertView, ViewGroup parent)
{
View v = convertView;
if (v == null)
{
LayoutInflater vi = (LayoutInflater)getSystemService(Context.LAYOUT_INFLATER_SERVICE);
v = vi.inflate(R.layout.dodad_row, null);
}
Dodad dodad = dodads.get(position);
if (dodad != null)
{
TextView line1 = (TextView) v.findViewById(R.id.textDodadLine1);
if (line1 != null)
{
line1.setText(dodad.getName());
}
TextView line2 = (TextView) v.findViewById(R.id.textDodadLine2);
if(line2 != null)
{
line2.setText(dodad.getDescription());
}
}
return v;
}
}
}
Saturday, January 22, 2011
Intro to ListActivity 101
A very common Activity in many apps is the List. The List is commonly used for Menus and Navigations and can also be used to display data, ala a table.
Mastering the ListActivity and ListView early should be a goal.
In my example, MyDemo, I will show how I created a ListActivity to display "Dodads".
Before I created the ListActivity I created a simple Dodad class with two properties, name and Description.
Dodad.java
Next I created my ListActivity class, in this case I just called it Welcome since it's the main activity for my app.
In it's bare bones it should look like this.
Welcome.java
Notice that I use the android.util.log class to mark when the onCreate method is executed, both in and out. This is a good habit as far as I'm concerned. Debugging your application via the log is difficult if you don't log effectively. Learn to use the log utility and it's different levels. You can also see I created a TAG for my application name, this makes finding my applications log statements easier. Especially since the DDMS log allows you to set filters based upon this TAG.
Now is the time to create the layout for this ListActivity. I created a very simple, probably as simple as it gets, layout.
main.xml
I used a LinearLayout to hold the ListView and a TextView. Thing to note here is the id used for the ListView and the TextView. The ListActivity looks for a ListView in the layout with an id of 'android:list'. If it doesn't find it I've found that it's not happy. Also the TextView has an id of 'android:empty' which allows it to be displayed in lieu of ListView. This means it's designed to tell the user there is no data for the list. In this case I also added a string to the string.xml that states as much.
Here's where things take the next step. Since I want to display the Dodad Name and Description in each List item I'll need to create another layout that defines the List item or row as I tend to call it. I'll also need to create an Adapter for the ListView, in this case an ArrayAdapter.
First let's look at the layout needed to display two lines of text within each ListView item.
dodad_row.xml
This layout was simple enough, again at the root is a LinearLayout with a vertical orientation. The orientation is vertical because I want the two lines of text to be on top of each other. Within the LinearLayout you see two TextViews, one for the top line and one for the bottom line. I set their text size so that the top row is larger than the bottom. That's just the look I'm going for, feel free to play around in here to make the ListView item appear however you desire.
Now we go back to the Java code in the ListActivity class. I needed to add an Adapter to link the Dodad class to the ListView and to apply the layout above to each ListView item.
You can see the class I added below.
Now feel free to just copy that code and know that it just works but I suggest to take the time to dissect it and understand what it's doing, at least at a basic level. First note that the class extends ArrayAdapter which we are feeding in our Dodad class. Second thing to note is the override of the getView method. This allows us to apply our custom layout to each ListView item or as the API calls it 'inflate'. it's in this method where the data is extracted from the Dodad object. So if we added an additional property to the Dodad class and we wanted to display it in the ListView as well we would need to come back here and make that happen.
We are now so close to running our ListView app and seeing what we've accomplished.
We now need to write some code to initialize our Dodad data. In this example I simply wrote a method to do this. In the real world this data would most likely come from resources or a server/database. But I wanted to focus on the ListView so it's just hard coded for now.
Really close to running the ListActivity app for the first time. We now only need to go back to our onCreate method of our ListActivity and make the call to our getDodads method and to set the ArrayAdapter.
Here is the onCreate method after these last modifications.
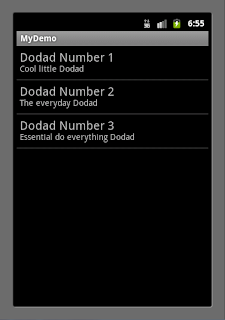
Now we can run our app! And this is what we see.
Here is the entire source for the ListActivity class.
Welcome.java
Mastering the ListActivity and ListView early should be a goal.
In my example, MyDemo, I will show how I created a ListActivity to display "Dodads".
Before I created the ListActivity I created a simple Dodad class with two properties, name and Description.
Dodad.java
package com.mydemo.dodad;
public class Dodad {
private String m_name;
private String m_description;
public String getName() {
return m_name;
}
public void setName(String name) {
this.m_name = name;
}
public String getDescription() {
return m_description;
}
public void setDescription(String description) {
this.m_description = description;
}
}
Next I created my ListActivity class, in this case I just called it Welcome since it's the main activity for my app.
In it's bare bones it should look like this.
Welcome.java
package com.mydemo;
import android.app.ListActivity;
import android.os.Bundle;
import android.util.Log;
public class Welcome extends ListActivity {
private static final String TAG = "MyDemo";
public void onCreate(Bundle savedInstanceState) {
Log.d(TAG, "Welcome onCreate() start");
super.onCreate(savedInstanceState);
setContentView(R.layout.main);
Log.d(TAG, "Welcome onCreate() done");
}
}
Notice that I use the android.util.log class to mark when the onCreate method is executed, both in and out. This is a good habit as far as I'm concerned. Debugging your application via the log is difficult if you don't log effectively. Learn to use the log utility and it's different levels. You can also see I created a TAG for my application name, this makes finding my applications log statements easier. Especially since the DDMS log allows you to set filters based upon this TAG.
Now is the time to create the layout for this ListActivity. I created a very simple, probably as simple as it gets, layout.
main.xml
<?xml version="1.0" encoding="utf-8"?>
<LinearLayout xmlns:android="http://schemas.android.com/apk/res/android"
android:orientation="vertical"
android:layout_width="fill_parent"
android:layout_height="fill_parent"
>
<ListView
android:id="@+id/android:list"
android:layout_width="fill_parent"
android:layout_height="fill_parent"
/>
<TextView
android:id="@+id/android:empty"
android:layout_width="fill_parent"
android:layout_height="fill_parent"
android:text="@string/no_dodads"/>
</LinearLayout>
I used a LinearLayout to hold the ListView and a TextView. Thing to note here is the id used for the ListView and the TextView. The ListActivity looks for a ListView in the layout with an id of 'android:list'. If it doesn't find it I've found that it's not happy. Also the TextView has an id of 'android:empty' which allows it to be displayed in lieu of ListView. This means it's designed to tell the user there is no data for the list. In this case I also added a string to the string.xml that states as much.
Here's where things take the next step. Since I want to display the Dodad Name and Description in each List item I'll need to create another layout that defines the List item or row as I tend to call it. I'll also need to create an Adapter for the ListView, in this case an ArrayAdapter.
First let's look at the layout needed to display two lines of text within each ListView item.
dodad_row.xml
<?xml version="1.0" encoding="utf-8"?>
<LinearLayout xmlns:android="http://schemas.android.com/apk/res/android"
android:layout_width="fill_parent"
android:layout_height="?android:attr/listPreferredItemHeight"
android:padding="5dp">
<LinearLayout
android:orientation="vertical"
android:layout_width="0dp"
android:layout_weight="1"
android:layout_height="fill_parent">
<TextView
android:id="@+id/textDodadLine1"
android:layout_width="fill_parent"
android:layout_height="0dp"
android:layout_weight="1"
android:gravity="center_vertical"
android:textSize="20sp"/>
<TextView
android:layout_width="fill_parent"
android:layout_height="0dp"
android:layout_weight="1"
android:id="@+id/textDodadLine2"
android:singleLine="true"
android:textSize="14sp"/>
</LinearLayout>
</LinearLayout>
This layout was simple enough, again at the root is a LinearLayout with a vertical orientation. The orientation is vertical because I want the two lines of text to be on top of each other. Within the LinearLayout you see two TextViews, one for the top line and one for the bottom line. I set their text size so that the top row is larger than the bottom. That's just the look I'm going for, feel free to play around in here to make the ListView item appear however you desire.
Now we go back to the Java code in the ListActivity class. I needed to add an Adapter to link the Dodad class to the ListView and to apply the layout above to each ListView item.
You can see the class I added below.
private class DodadAdapter extends ArrayAdapter
{
private ArrayList dodads;
public DodadAdapter(Context context, int textViewResourceId, ArrayList dodads)
{
super(context, textViewResourceId, dodads);
this.dodads = dodads;
}
@Override
public View getView(int position, View convertView, ViewGroup parent)
{
View v = convertView;
if (v == null)
{
LayoutInflater vi = (LayoutInflater)getSystemService(Context.LAYOUT_INFLATER_SERVICE);
v = vi.inflate(R.layout.dodad_row, null);
}
Dodad dodad = dodads.get(position);
if (dodad != null)
{
TextView line1 = (TextView) v.findViewById(R.id.textDodadLine1);
if (line1 != null)
{
line1.setText(dodad.getName());
}
TextView line2 = (TextView) v.findViewById(R.id.textDodadLine2);
if(line2 != null)
{
line2.setText(dodad.getDescription());
}
}
return v;
}
}
{
private ArrayList
public DodadAdapter(Context context, int textViewResourceId, ArrayList
{
super(context, textViewResourceId, dodads);
this.dodads = dodads;
}
@Override
public View getView(int position, View convertView, ViewGroup parent)
{
View v = convertView;
if (v == null)
{
LayoutInflater vi = (LayoutInflater)getSystemService(Context.LAYOUT_INFLATER_SERVICE);
v = vi.inflate(R.layout.dodad_row, null);
}
Dodad dodad = dodads.get(position);
if (dodad != null)
{
TextView line1 = (TextView) v.findViewById(R.id.textDodadLine1);
if (line1 != null)
{
line1.setText(dodad.getName());
}
TextView line2 = (TextView) v.findViewById(R.id.textDodadLine2);
if(line2 != null)
{
line2.setText(dodad.getDescription());
}
}
return v;
}
}
Now feel free to just copy that code and know that it just works but I suggest to take the time to dissect it and understand what it's doing, at least at a basic level. First note that the class extends ArrayAdapter which we are feeding in our Dodad class. Second thing to note is the override of the getView method. This allows us to apply our custom layout to each ListView item or as the API calls it 'inflate'. it's in this method where the data is extracted from the Dodad object. So if we added an additional property to the Dodad class and we wanted to display it in the ListView as well we would need to come back here and make that happen.
We are now so close to running our ListView app and seeing what we've accomplished.
We now need to write some code to initialize our Dodad data. In this example I simply wrote a method to do this. In the real world this data would most likely come from resources or a server/database. But I wanted to focus on the ListView so it's just hard coded for now.
private void getDodads()
{
Log.d(TAG, "Welcome getDodads() start");
try
{
// Just some dummy data for the purpose of the sample
// This code could easily fetch data from a server/database.
m_dodads = new ArrayList();
Dodad dodad1 = new Dodad();
dodad1.setName("Dodad Number 1");
dodad1.setDescription("Cool little Dodad");
Dodad dodad2 = new Dodad();
dodad2.setName("Dodad Number 2");
dodad2.setDescription("The everyday Dodad");
Dodad dodad3 = new Dodad();
dodad3.setName("Dodad Number 3");
dodad3.setDescription("Essential do everything Dodad");
m_dodads.add(dodad1);
m_dodads.add(dodad2);
m_dodads.add(dodad3);
Log.d(TAG, "Welcome getDodads() returned (" + m_dodads.size() + ") dodads");
}
catch (Exception e)
{
Log.e(TAG, e.getMessage());
}
Log.d(TAG, "Welcome getDodads() done");
}
{
Log.d(TAG, "Welcome getDodads() start");
try
{
// Just some dummy data for the purpose of the sample
// This code could easily fetch data from a server/database.
m_dodads = new ArrayList
Dodad dodad1 = new Dodad();
dodad1.setName("Dodad Number 1");
dodad1.setDescription("Cool little Dodad");
Dodad dodad2 = new Dodad();
dodad2.setName("Dodad Number 2");
dodad2.setDescription("The everyday Dodad");
Dodad dodad3 = new Dodad();
dodad3.setName("Dodad Number 3");
dodad3.setDescription("Essential do everything Dodad");
m_dodads.add(dodad1);
m_dodads.add(dodad2);
m_dodads.add(dodad3);
Log.d(TAG, "Welcome getDodads() returned (" + m_dodads.size() + ") dodads");
}
catch (Exception e)
{
Log.e(TAG, e.getMessage());
}
Log.d(TAG, "Welcome getDodads() done");
}
Really close to running the ListActivity app for the first time. We now only need to go back to our onCreate method of our ListActivity and make the call to our getDodads method and to set the ArrayAdapter.
Here is the onCreate method after these last modifications.
public void onCreate(Bundle savedInstanceState)
{
Log.d(TAG, "Welcome onCreate() start");
super.onCreate(savedInstanceState);
setContentView(R.layout.main);
m_dodads = new ArrayList();
this.m_adapter = new DodadAdapter(this, R.layout.dodad_row, m_dodads);
setListAdapter(this.m_adapter);
getDodads();
if(m_dodads != null && m_dodads.size() > 0)
{
for(int i=0; i < m_dodads.size(); i++) { m_adapter.add(m_dodads.get(i)); } m_adapter.notifyDataSetChanged(); } m_adapter.notifyDataSetChanged(); Log.d(TAG, "Welcome onCreate() done");
}
{
Log.d(TAG, "Welcome onCreate() start");
super.onCreate(savedInstanceState);
setContentView(R.layout.main);
m_dodads = new ArrayList
this.m_adapter = new DodadAdapter(this, R.layout.dodad_row, m_dodads);
setListAdapter(this.m_adapter);
getDodads();
if(m_dodads != null && m_dodads.size() > 0)
{
for(int i=0; i < m_dodads.size(); i++) { m_adapter.add(m_dodads.get(i)); } m_adapter.notifyDataSetChanged(); } m_adapter.notifyDataSetChanged(); Log.d(TAG, "Welcome onCreate() done");
}
Now we can run our app! And this is what we see.

Here is the entire source for the ListActivity class.
Welcome.java
package com.mydemo;
import java.util.ArrayList;
import com.mydemo.dodad.Dodad;
import android.app.ListActivity;
import android.content.Context;
import android.os.Bundle;
import android.util.Log;
import android.view.LayoutInflater;
import android.view.View;
import android.view.ViewGroup;
import android.widget.ArrayAdapter;
import android.widget.TextView;
public class Welcome extends ListActivity {
private static final String TAG = "MyDemo";
private ArrayList m_dodads = null;
private DodadAdapter m_adapter;
public void onCreate(Bundle savedInstanceState) {
Log.d(TAG, "Welcome onCreate() start");
super.onCreate(savedInstanceState);
setContentView(R.layout.main);
m_dodads = new ArrayList();
this.m_adapter = new DodadAdapter(this, R.layout.dodad_row, m_dodads);
setListAdapter(this.m_adapter);
getDodads();
if(m_dodads != null && m_dodads.size() > 0)
{
for(int i=0; i < m_dodads.size(); i++) { m_adapter.add(m_dodads.get(i)); } m_adapter.notifyDataSetChanged(); } m_adapter.notifyDataSetChanged(); Log.d(TAG, "Welcome onCreate() done"); } private void getDodads() { Log.d(TAG, "Welcome getDodads() start"); try { // Just some dummy data for the purpose of the sample // This code could easily fetch data from a server/database. m_dodads = new ArrayList();
Dodad dodad1 = new Dodad();
dodad1.setName("Dodad Number 1");
dodad1.setDescription("Cool little Dodad");
Dodad dodad2 = new Dodad();
dodad2.setName("Dodad Number 2");
dodad2.setDescription("The everyday Dodad");
Dodad dodad3 = new Dodad();
dodad3.setName("Dodad Number 3");
dodad3.setDescription("Essential do everything Dodad");
m_dodads.add(dodad1);
m_dodads.add(dodad2);
m_dodads.add(dodad3);
Log.d(TAG, "Welcome getDodads() returned (" + m_dodads.size() + ") dodads");
}
catch (Exception e)
{
Log.e(TAG, e.getMessage());
}
Log.d(TAG, "Welcome getDodads() done");
}
private class DodadAdapter extends ArrayAdapter
{
private ArrayList dodads;
public DodadAdapter(Context context, int textViewResourceId, ArrayList dodads)
{
super(context, textViewResourceId, dodads);
this.dodads = dodads;
}
@Override
public View getView(int position, View convertView, ViewGroup parent)
{
View v = convertView;
if (v == null)
{
LayoutInflater vi = (LayoutInflater)getSystemService(Context.LAYOUT_INFLATER_SERVICE);
v = vi.inflate(R.layout.dodad_row, null);
}
Dodad dodad = dodads.get(position);
if (dodad != null)
{
TextView line1 = (TextView) v.findViewById(R.id.textDodadLine1);
if (line1 != null)
{
line1.setText(dodad.getName());
}
TextView line2 = (TextView) v.findViewById(R.id.textDodadLine2);
if(line2 != null)
{
line2.setText(dodad.getDescription());
}
}
return v;
}
}
}
import java.util.ArrayList;
import com.mydemo.dodad.Dodad;
import android.app.ListActivity;
import android.content.Context;
import android.os.Bundle;
import android.util.Log;
import android.view.LayoutInflater;
import android.view.View;
import android.view.ViewGroup;
import android.widget.ArrayAdapter;
import android.widget.TextView;
public class Welcome extends ListActivity {
private static final String TAG = "MyDemo";
private ArrayList
private DodadAdapter m_adapter;
public void onCreate(Bundle savedInstanceState) {
Log.d(TAG, "Welcome onCreate() start");
super.onCreate(savedInstanceState);
setContentView(R.layout.main);
m_dodads = new ArrayList
this.m_adapter = new DodadAdapter(this, R.layout.dodad_row, m_dodads);
setListAdapter(this.m_adapter);
getDodads();
if(m_dodads != null && m_dodads.size() > 0)
{
for(int i=0; i < m_dodads.size(); i++) { m_adapter.add(m_dodads.get(i)); } m_adapter.notifyDataSetChanged(); } m_adapter.notifyDataSetChanged(); Log.d(TAG, "Welcome onCreate() done"); } private void getDodads() { Log.d(TAG, "Welcome getDodads() start"); try { // Just some dummy data for the purpose of the sample // This code could easily fetch data from a server/database. m_dodads = new ArrayList
Dodad dodad1 = new Dodad();
dodad1.setName("Dodad Number 1");
dodad1.setDescription("Cool little Dodad");
Dodad dodad2 = new Dodad();
dodad2.setName("Dodad Number 2");
dodad2.setDescription("The everyday Dodad");
Dodad dodad3 = new Dodad();
dodad3.setName("Dodad Number 3");
dodad3.setDescription("Essential do everything Dodad");
m_dodads.add(dodad1);
m_dodads.add(dodad2);
m_dodads.add(dodad3);
Log.d(TAG, "Welcome getDodads() returned (" + m_dodads.size() + ") dodads");
}
catch (Exception e)
{
Log.e(TAG, e.getMessage());
}
Log.d(TAG, "Welcome getDodads() done");
}
private class DodadAdapter extends ArrayAdapter
{
private ArrayList
public DodadAdapter(Context context, int textViewResourceId, ArrayList
{
super(context, textViewResourceId, dodads);
this.dodads = dodads;
}
@Override
public View getView(int position, View convertView, ViewGroup parent)
{
View v = convertView;
if (v == null)
{
LayoutInflater vi = (LayoutInflater)getSystemService(Context.LAYOUT_INFLATER_SERVICE);
v = vi.inflate(R.layout.dodad_row, null);
}
Dodad dodad = dodads.get(position);
if (dodad != null)
{
TextView line1 = (TextView) v.findViewById(R.id.textDodadLine1);
if (line1 != null)
{
line1.setText(dodad.getName());
}
TextView line2 = (TextView) v.findViewById(R.id.textDodadLine2);
if(line2 != null)
{
line2.setText(dodad.getDescription());
}
}
return v;
}
}
}
Registering Activities in AndroidManifest
Here is one little gotcha that I personally stumbled over briefly (Because I rarely stop to read). Early on when adding new Activities into my Android project I was not defining them in the AndroidManifest. If you add a new Activity and try to start it in your application without it being defined in the AndroidManifest your application will fail and force shutdown.
Here is the AndroidManifest.xml from my previous ListActivity example. You can see where each Activity for the TabHost is defined.
Here is the AndroidManifest.xml from my previous ListActivity example. You can see where each Activity for the TabHost is defined.
<?xml version="1.0" encoding="utf-8"?>
<manifest xmlns:android="http://schemas.android.com/apk/res/android"
package="com.hummingbird"
android:versionCode="1"
android:versionName="1.0">
<application android:icon="@drawable/icon" android:label="@string/app_name">
<activity android:name=".Welcome"
android:label="@string/app_name">
<intent-filter>
<action android:name="android.intent.action.MAIN" />
<category android:name="android.intent.category.LAUNCHER" />
</intent-filter>
</activity>
<activity android:name=".Accounts"
android:label="@string/app_name">
</activity>
<activity android:name=".Transfer"
android:label="@string/app_name">
</activity>
<activity android:name=".Alerts"
android:label="@string/app_name">
</activity>
</application>
</manifest>
My Dev Environment
The first place any budding Android developer should visit is :
http://developer.android.com/index.html
I used the guides provides here to setup my development environment. I choose to use Eclipse with the Android ADT plugin because of my familiarity with Eclipse. I wanted to flatten the learning curve as much as possible. Granted this is the only setup I've used so far as Android is concerned but I don't have any complaints and rather I've found the whole platform very intuitive and well designed. Kudos to the Gods at Google.
I'm currently running Eclipse Classic 3.6.1, they call it Helios with JDK 1.6.0_23.
Once you have your Eclipse environment configured you can follow the instruction here to get the Android SDK installed :
http://developer.android.com/sdk/index.html
and add the ADT plugin to Eclipse :
http://developer.android.com/sdk/eclipse-adt.html
It's as easy as that to get your Android dev environment up and running using Eclipse w/ADT plugin.
Subscribe to:
Posts (Atom)